Last updated: June 21, 2024
Project Goal
Get my feet wet with Ansible by using it to rebuild my website with a single command.
Backstory
Currently, I update Cyberchirps by writing new Markdown files and then running a custom script that pushes the new content to my webserver. However, afterwards, I still have to log in to the server and restart Nginx to make the changes live.
Recently, I learned about Ansible, an extremely popular tool for automating server management in enterprise environments. I followed a tutorial to test out Ansible using Linode servers, but then realised I could use it to automately make new website content live in a single command!
What is “Ansible”?
Ansible is a free, easy-to-use, Python-based tool that lets a system administrator automate the deployment, management, and security of as many systems as they want! 💻
Benefits of Ansible:
- Free, open source
- Agentless (no need to install software on the managed nodes)
- Can manage Windows systems too!
- Pushes configurations to nodes, rather than pulling from nodes.
- Human-readable YAML-based playbooks files
- Sponsored by Red Hat
As we saw in my last post, setting up and securing a webserver at the command line is a great learning experience. However, if I needed to quickly create multiple servers, this would quickly become very time-consuming. Ansible solves this problem by using “playbooks”—files that act like powerful scripts, automatically carrying out whatever tasks you set up in advance.
How it Works
To use Ansible, you need 2 things:
- A Control Node: a computer running Ansible that will act as the “master” system, containing the Ansible installation and playbook files.
- Nodes: computers that are managed remotely via the control node.
1) NetworkChuck’s Tutorial
A quick look online pointed me to the idea that I can use Linode to practice deploying cloud servers using Ansible. Since I was already familiar with Linode, I was excited to get started right away.
Searching for guides on this topic, I found NetworkChuck’s tutorial. Perfect! I like Chuck’s content: it’s always high quality, motivating, and easy to follow! 😎
Linode: Setting up a basic Control Node
Like I outline in my previous post (see that for follow-along steps), I used Linode-hosted Nanodes to act as my cloud servers.
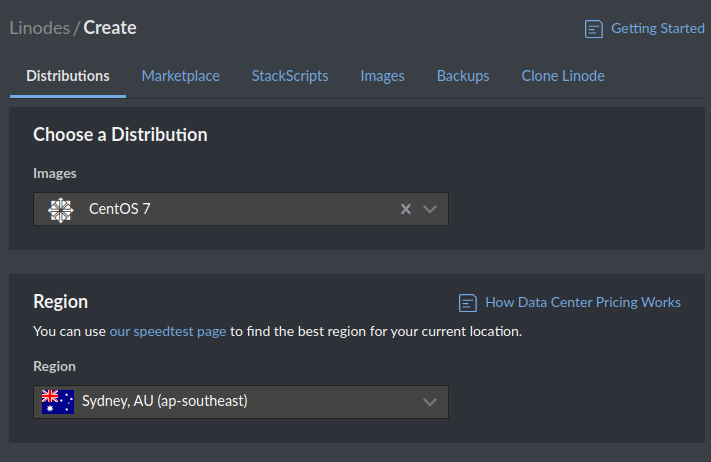
This time, instead of using Ubuntu, I set up the Linode with CentOS to simulate a Red Hat-focused environment. Even though the CentOS has been discontinued, Linode offers it as a server image which works fine for this test.
Updating the Control Node
Once the Nanode booted up, I SSHed into it as root.
Because this was CentOS, I updated the system using the CentOS yum package manager instead of apt:
yum update -y

Installing Ansible
As per NetworkChuck’s instructions, I installed the epel-release along with Ansible.
yum install epel-release -y && yum install ansible -y

Setting up the 2 Test Nodes
Before I get into using Ansible, I’ll need to set up some test servers for the Control Node to manage.
Like the Control Node, I created 2 additional CentOS servers to act as the test nodes:
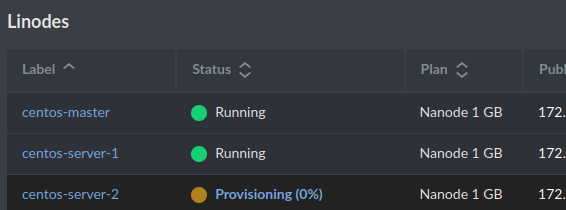
I simply repeated the create new Linode –> Shared CPU –> Nanode steps until I had 2 up and running.
Configuring Ansible on the Control Node
With the test servers up, it was time to configure Ansible.
When installed like this, Ansible automatically creates a directory in etc/ansible/ to hold its install-wide settings:
cd /etc/ansible/
ls
Taking a look inside, we see 3 files of interest:

ansible.cfg: holds configuration data for Ansible. You can adjust various settings here, such as default module paths, inventory file locations, and SSH options.hosts: holds information about the managed nodes. It is where I’ll put the IP addresses of my test servers, organising them into groups if needed.roles: This directory is used to store reusable sets of Ansible tasks. Roles help to organise tasks and can be shared accross multiple playbooks.
Adding Hosts to Host:
First I needed to add my managed nodes and login credentials to the hosts file. As I won’t be using these servers for anything else, I left the credentials as default.
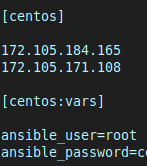
First I set a group called “centos” to refer to my managed nodes:
[centos]
172.105.184.165
172.105.171.108
Then, using the [group_name:var] syntax, I set the login credential variables that apply to all servers in the centos group:
[centos:vars]

ansible_user=root
ansible_password=[password]
The file now looked like this:
Adjusting the ansible.cfg File
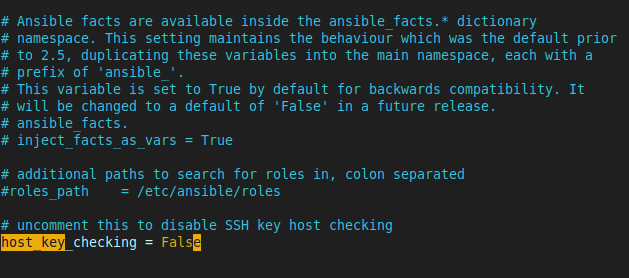
As I’m only using password login with root (don’t do this on a real server!), I needed to disable the default key-based authentication used by Ansible to log in to the servers. Normally this default makes things nice and easy to connect using SSH key pairs, like with my webserver, but I didn’t want that for this test.
Inside ansible.cfg, I uncommented the following line:
host_key_checking = False
Testing Ansible
The basic Ansible configuration is now set up.
To test the Control Node can interact with the managed nodes, I ran:
ansible centos -m ping
Breaking this command down:
ansible: calls the Ansible tool.centos: refers to my group of managed nodes which I set up in thehostfile.-m ping: runs the module (-m) called ping, which tests that we have a network connection to managed nodes.
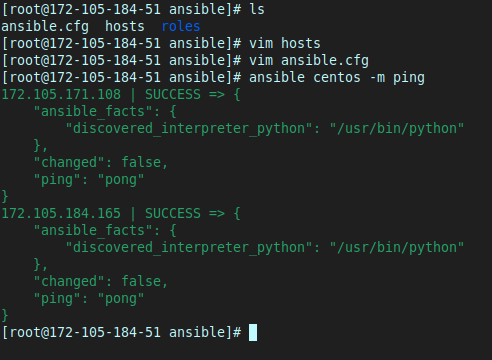
This output means the Control Node remotely connected to the 2 managed servers, ran the module that runs the “ping” command between those servers, then gave a success message.
Chuck also showed that you can make the managed nodes run any command, such as displaying the os-release version for each of the nodes:
ansible centos -a "cat /etc/os-release"
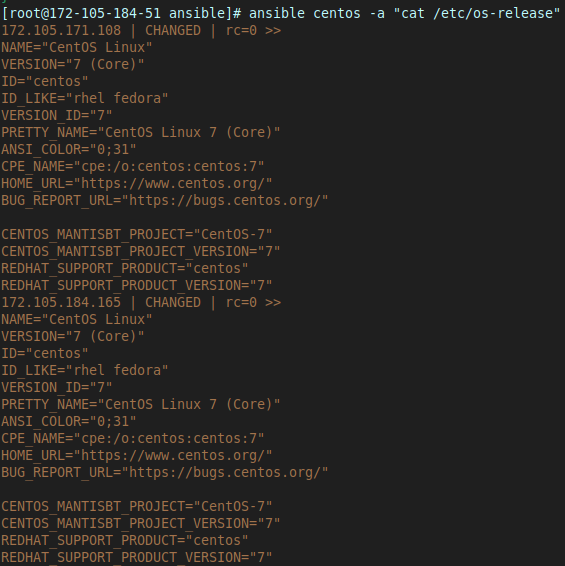
With this syntax, we can run any command we want on all the servers inside the host file, all in a single command.
This is all very cool, but the real power of Ansible comes from writing Playbooks, which perform many commands in sequence, on any set of hosts that we want.
Types of Automation Playbooks can Perform
Here are just a few of the types of tasks Ansible can perform:
- Server Setup and Configuration:
- Automatically set up web servers, database servers, and application servers.
- Install and configure software packages (e.g., Nginx, Apache, MySQL).
- Apply security patches and updates.
- Application Deployment:
- Deploy web applications and services.
- Manage application configurations and environment settings.
- Rollback deployments if something goes wrong.
- User Management:
- Create, modify, and delete user accounts.
- Set up firewalls and security groups.
- Network Configuration:
- Configure network interfaces and routing.
- Manage DNS and DHCP Settings.
Essentially, anything that can be done manually on a server can be automated and executed across multiple host groups with Ansible. This makes Ansible an incredibly powerful tool!
2) Using Ansible to Automate Cyberchirps
I wanted to employ the power of Ansible to help me manage my own webserver! 😎
Here is my script that automatically pushes new files to my Cyberchirps web server:
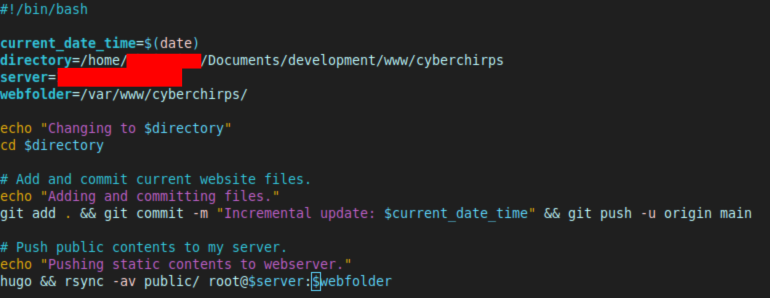
I ran the script from its local directory like this:
./push_server.sh
My problem was that after I ran the script, I still had to SSH into my webserver and restart Nginx manually.
Installing Ansible on Linux Mint
Ansible is already loaded into the Mint repositories:
sudo apt install ansible -y
I noticed that this install didn’t automatically create the /etc/ansible/ directory, however, I found out I can just create a local directory in my Home folder that overrides system-wide Ansible configurations. This might be better practice anyway.
Creating an Ansible Inventory (.ini) File
I checked out the Ansible Documentation to see the general quick start guide.
Similar to the CentOS tutorial above, I added the Cyberchirps webserver’s IP to a group called [webservers] inside a new file called inventory.ini. This lets Ansible know the IP of my webserver and any other managed nodes.
[webservers]
ip_address_here
Luckily, Ansible is smart enough to use my pre-configured SSH key-based authentication automatically, allowing it to connect to my webserver as if it were me, so I didn’t need to configure any SSH details.
Creating a Playbook to update Nginx
Following the Documentation, I created a playbook.yaml file in the same directory as inventory.ini to hold a ‘play’ called “Restart Nginx” that holds the ‘tasks’ to perform:
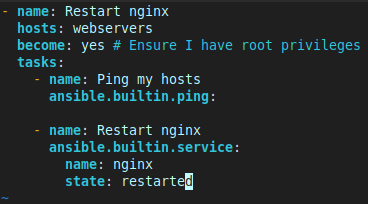
When run, this playbook will connect to my server, test it is up with ping, and then restart Nginx, prompting me for my password.
Calling Ansible via a Script
While I could run the playbook at the command line, I instead incorporated my old script and the Ansible automation into one ultra-script 🤣 :

So with all this set up, here’s how I update my website now 😎 :
- I open a terminal (which is automatically in my
homedirectory). - I type
./upand presstab, autocompleting the command –>./update-server-make-live.sh - I press enter.
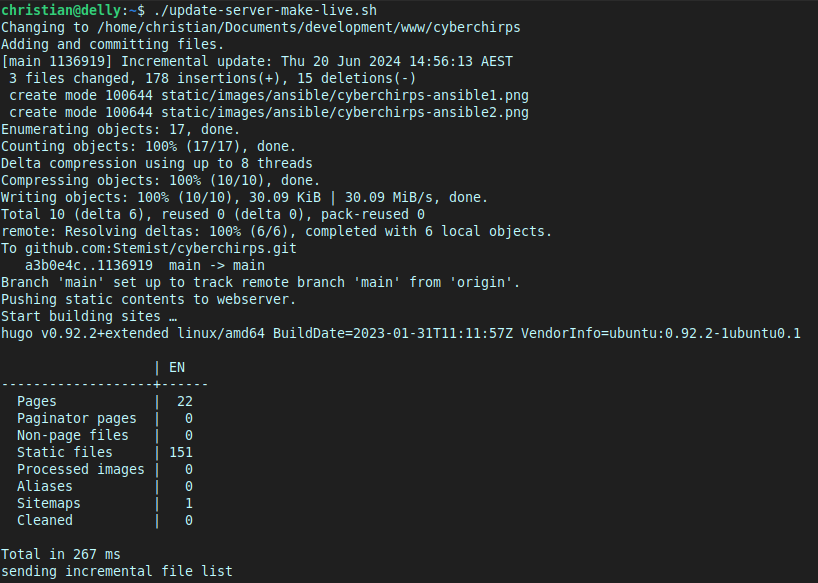
Then this magic happens automatically:
./push_server.shruns, which:- Changes to the directory holding my new website files.
- Calls Hugo to builds the static site files.
- Commits and pushes all the changes to my Github.
- Syncs the new files to the relevant Cyberchirps webserver directory.
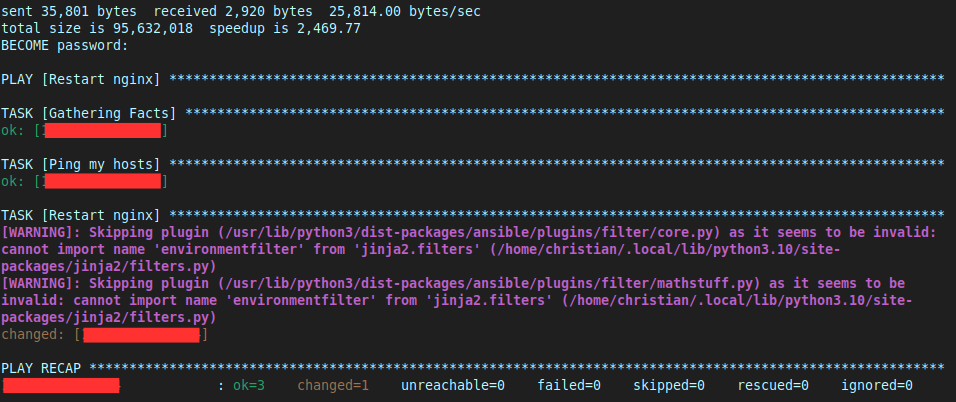
- Directory change to the Ansible directory.
- Calls the Ansible playbook I just made, which:
- Connects to the Cyberchirps webserver.
- Tests it is up.
- Prompts me for my password, then restarts Nginx
All this takes less than 10 seconds, with almost no action from me. Here’s how it looks:
Conclusion
Wow! It’s cool how, in a few days, you can go from never having heard of a tool before to using it help you solve problems.
All this automation is exciting! You know what it reminds me of?

What’s Next
Now that I’ve automated one useful task using Ansible, I intend to build playbooks that take care of more aspects of server management, especially deploying and setting up new servers. Mastering Ansible will no doubt grow my capabilities, both personally and professionally!
Special Thanks
I want to thank the following people:
- NetworkChuck for creating a great Ansible tutorial!
- My friends for proofreading this post!
- You—for reading this! ❤️