Last updated: June 15, 2024
Disclaimer: Technology is an inherently fiddly thing, and your intended use-case and configuration may be different from mine. If you run into problems at any point, there’s plenty of resources online for each part of this process. Meanwhile, I’ve done my best to keep the guide generally useful while also accurately reflecting the history of how I set this site up.
Who This Post Is For
I’ve written this post assuming you:
- Want to learn more about server administration by setting up a Linux server from scratch.
- Appreciate having total control over your server’s backend.
- Have some knowledge of the Linux command line.
AND / OR you:
- Simply want to know how I set up this website.
Pros: Why I like Linode
You Can Make Small, Specialised Servers for Different Uses
Firstly, Linodes are great for spinning up little Linux servers quickly and cheaply.
Because they’re on the cloud, you can flexibly clone, manage, and recreate them without needing physical hardware. You can also easily delete them once you’re done with them, without incurring much cost.
Full control and freedom
Secondly, unlike some other hosting providers, you get remote root (admin) access for full control.
This means that you’re not restricted to just websites! For example, since Linode offers a pre-set-up Kali Linux image, you can run penetration testing Linodes for Hack The Box too!
Since I wanted experience manually setting up, securing, and running my own little web server to serve you this site, Linode was perfect.
Check That Linode is Right For You
That being said, using Linode requires you to manage the server yourself. If you make it internet-accessable, like a web server, you better make sure to secure it from attack. Security is all about trade-offs, making this a fairly labourious task—but doing it this way has taught me a lot about what’s going on in the server backend.
If instead you are interested in an all-in-one solution that lets you build websites without worrying about administration or security, then I’d recommend a service like Wix.
You can also use WordPress, which comes in two flavours: WordPress.com is the all-in-one, freemium solution, whereas WordPress.org is free and open source, and can be installed on any web host (including a Linode server).
But this is Cyberchirps, where I learn by doing. 🪶
So if you’re still keen to proceed, let’s go! 💪
Make Sure You Can Connect via Secure Shell (SSH)
Linode servers can be accessed remotely via Linode.com’s web portal command line, but I recommend using an SSH client to connect instead. This ensures a more convenient, more reliable connection, and makes it easier to move files between your local system and the server.
Before we proceed to set up our Linode, let’s check that you have an SSH client installed:
On Windows
Depending on your preference, here are your two main options:
- Graphical option: PuTTY.
- Command Line: Windows Powershell now has SSH built in.
On macOS
- Simply use your terminal: Enable SSH from the terminal
- Another option: Termius.
On Linux
Congratulations! SSH is probably pre-installed! Just open your terminal and verify with:
ssh
You should see something like this:

If not, try:
sudo apt install ssh -y
Substitute your package manager in place of “apt” as needed.
Linode
Make a New Linode
-
Go to Linode.com and create an account (or login using your existing Google or GitHub account).
-
Create a new Linode:
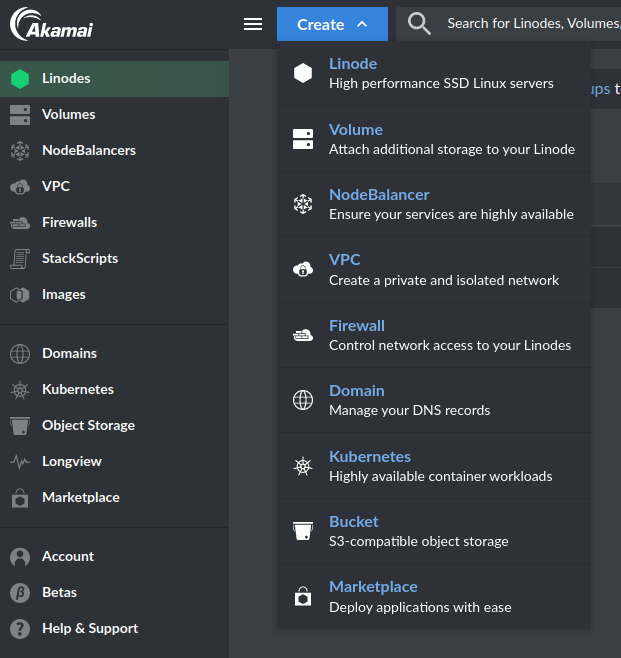
- Choose a Linux distribution and a hosting region. For a webserver, we can use a recent release of Ubuntu:

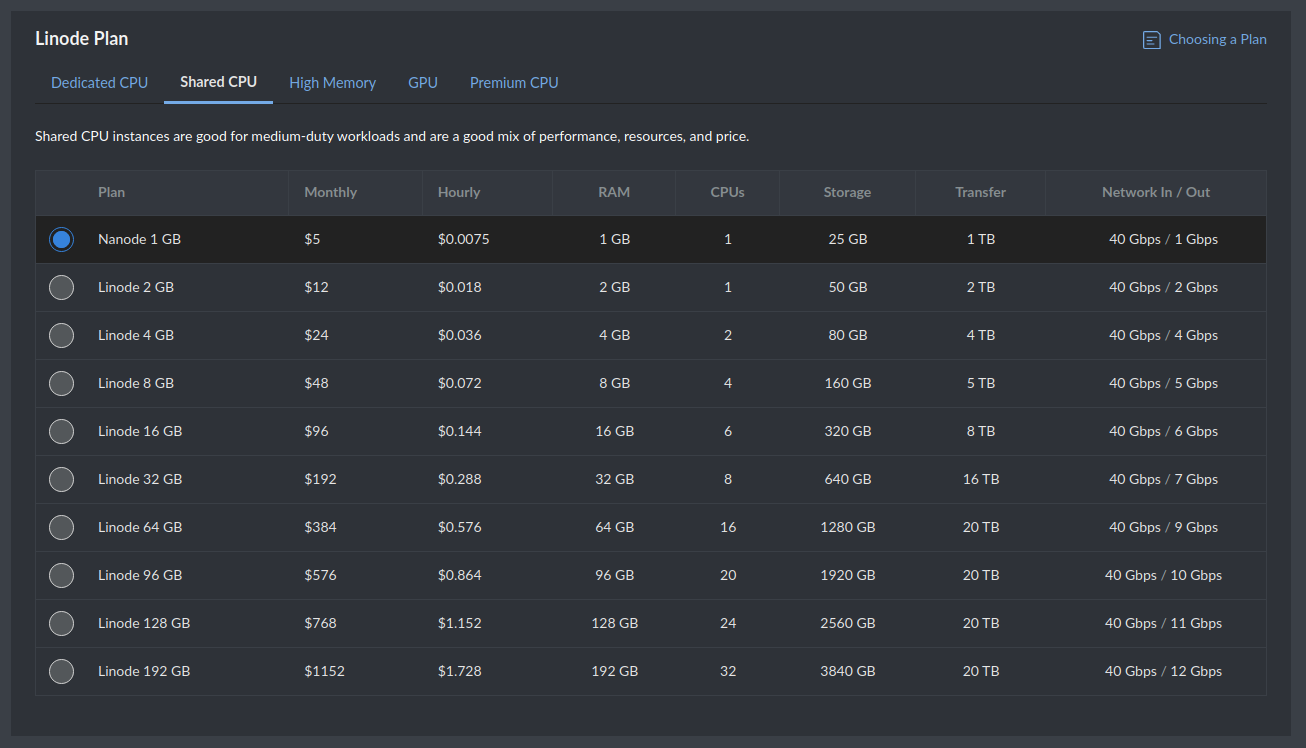
- For a simple webserver, we can use the smallest Nanode. Find it under “Shared CPU”:
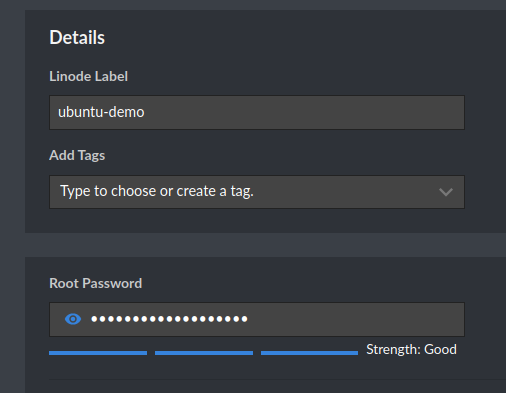
- Name your Linode something descriptive, and type a root password. Remember this password! It’s the password you’ll use to log in remotely!
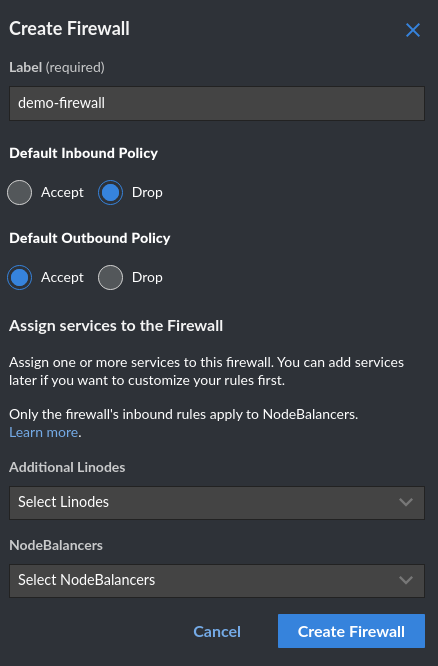
- We’ll need to only allow certain traffic to interact with your server. Scroll down and find the firewall setup drop-down.

Click it, and create a new firewall (or use one you’ve already created). Ensure the default inbound and outbound policies match the following image - you can add more rules later.
Then click Create Firewall.
- Optional: Add Backup functionality if you feel like it - not if this is just a throwaway server.
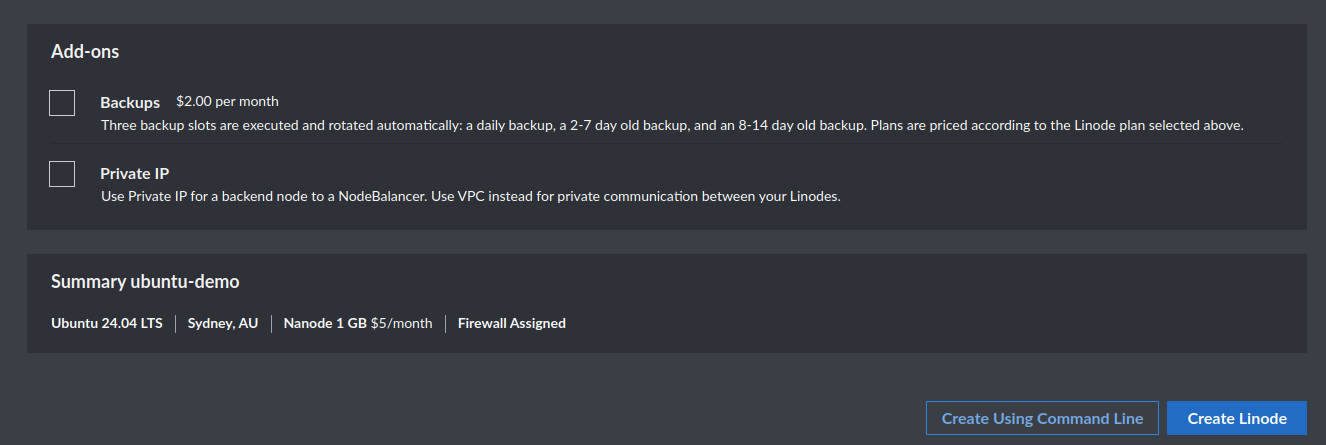
- Click Create Linode, and you should soon be taken to a screen that shows something like this. The server should start booting up. Once it’s done, it’ll say “ready”.

Set up the Linode Firewall
You could configure a firewall inside the server itself using something like ufw, but Linode recommends you don’t do that.
Instead, let’s go to the left of the screen and look for Firewalls.
a) Let’s add a rule that lets us remote into the server with SSH.
- Click
Add An Inbound Rule. - Click on the
Presetdrop-down. - Select
SSH. It should pre-fill. - Click Add Rule
b) Let’s also add rules that let web traffic requests reach the server.
For HTTPS:
- Click
Add An Inbound Rule. - Click on the
Presetdrop-down. - Select
HTTPS. It should pre-fill. - Click Add Rule.
And likewise for HTTP:
- Click
Add An Inbound Rule. - Click on the
Presetdrop-down. - Select
HTTP. It should pre-fill. - Click Add Rule.

💻 Inbound rule explanations:
- accept-inbound-SSH: Accepting all-source inbound SSH traffic via TCP on port 22 means you can connect to your server via your SSH client.
- accept-inbound-HTTPS: This allows browsers to request web content via HTTPS.
- accept-inbound-HTTP: Likewise for HTTP.
- Click save all.
Connect to your Server
Now you’ve set your firewall rules, you should be able to use SSH to remotely connect to your server, provided your computer has an SSH client and an internet connection.
You can find the needed details next to SSH Access:

In my case, I’d use:
ssh root@192.53.168.164
And type “yes” to accept my server as being legit (as I know what I’m connecting to).
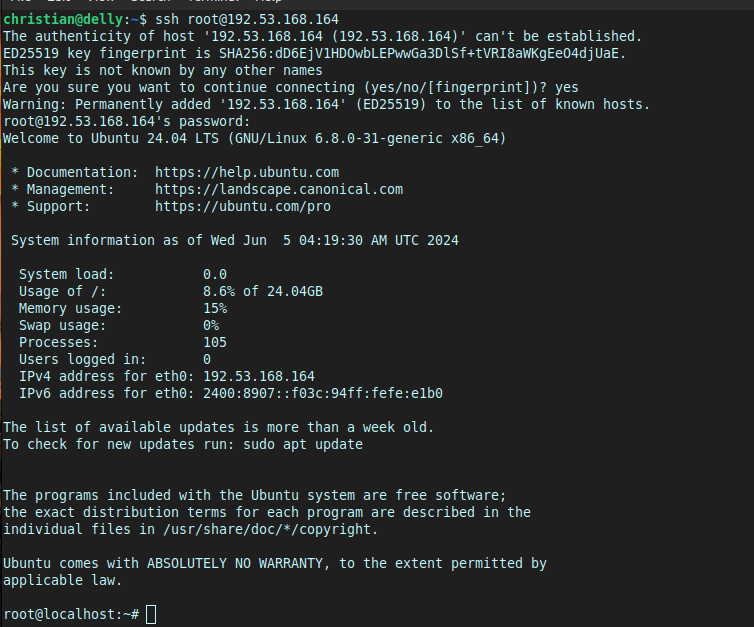
I’m in. 😎
Updating the Server
Since this is a fresh Ubuntu Linux image, we’ll want to update all the software on the server.
We’re logged in as root, so can just type:
apt update && apt upgrade -y
Note that:
aptis the package manager.apt updaterequests a list of updateable software from the Ubuntu repositories.&&if the previous command finishes successfully, run the next.apt upgrade -yupdates any updateable packages without asking for user feedback.
Afterwards, you’ll probably be prompted to reboot the server to fully install the kernel. Type reboot and press enter:
reboot
You’ll temporarily lose connection to the server. Wait for it to reboot. You can see the status of the server on the Linode web portal.
Optional: Set up a cron job to automate Server Updates
Enabling automatic updates without human oversight can sometimes break packages. For a server, this can mean downtime. Do the following at your own risk!
We can write a simple script that updates our system and then set a cron job to run it automatically. Keeping all software up-to-date is good security practice.
Make sure you’re in the root directory:
cd /root/
Now let’s create a new bash script file called update_system.sh, using a text editor of your choice. I like vim, but nano is easier to explain:
nano update_system.sh
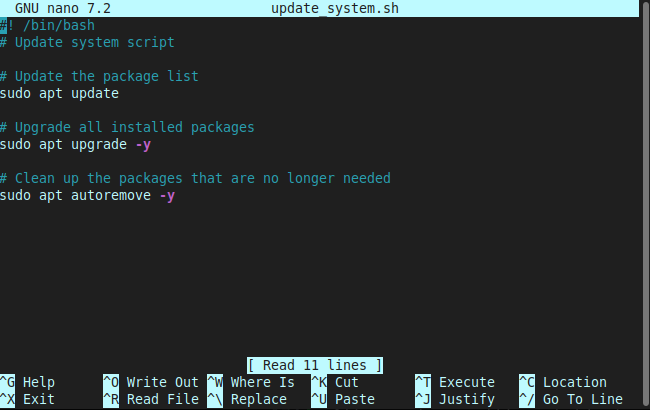
Fill out your script like the above, or modify it to your needs. Exit and save the file ctrl + X, and save when prompted. Keystrokes are:
- ctrl + x
- y
- enter
Make the file executable:
chmod u+x update_system.sh
Set up a cron job to execute the scipt:
echo "0 0 * * * /root/update_system.sh" | crontab -
This schedules the script, located at /root/update_system.sh, to run at midnight every day. If you want to modify the time it runs, here is a guide on seting up cron jobs.
Securing the Server
- Once the server reboots, log back into it over SSH.
We’ll want to do a few things to make sure our server isn’t pwned by the army of bots that are scanning all IPs on the internet.
I’ll show you what I mean. Let’s look at some recent SSH logs using the tail command on the auth.log file inside var/log/:

We see lots of failed login attempts. These are bots attepting to brute-force our root password and login via SSH.
So how can we prevent them from eventually cracking our root password?
1) Install fail2ban to ban IPs that fail consecutive login attempts
We can limit how many times they can attempt to log in, which can help protect our server while we set up other defenses. Fail2ban will ban IPs that fail to log in too many times.
apt install fail2ban -y
Now let’s configure it.
sudo systemctl status fail2ban
We can see that fail2ban isn’t yet active. Let’s set it up.
Enable on boot:
systemctl enable fail2ban
Start the service:
systemctl start fail2ban
This turns on fail2ban with default configuration. Feel free to follow their guide to do further config, if you wish. By default, 5 consequtive login attempts will blacklist the ip.
Side note: while testing this on a fresh Ubuntu, I ran into a dependency issue. If you encounter the same problem, try the steps in the previous link. Hopefully by the time you read this, the problem will be resolved by default.
2) Make and Add a new User to the Sudo-ers File
Currently, we’re logging in as root. But this is bad security practice—if someone cracked the root password or stole the private key (which we’ll set up later), it would allow them total control of the server.
Let’s prevent this by making a new user that can administrate the server by using sudo (requiring a password to run commands with admin privileges). This can help prevent problems if someone were to compromise the server.
On our new server, we’ll add our new user who we will use to administrate the server (In your case, I’m going to refer to this user as [your_user] from now on).
adduser [your_user]
Now let’s give them sudo privileges.
usermod -aG sudo [your_user]
Now our new user has sudo privileges! We’ll shortly set things up to prevent root login.
3) Set up SSH Keys For more Security
Now we have a new user, we can set up a more secure way of logging into the server: SSH keys. These allow us and only us to log in to the server, without needing a server-side password. Then, once we disable password and root log in, the server will be considerably more secure.
Generating SSH Keys
On Windows (PowerShell), macOS and Linux:
ssh-keygen -t ecdsa -b 521 -C "your@email.address"
Press Enter to accept the default file location. I recommend you enter a strong password to protect your private key.
This generates a private and public key using the ecdsa algroithm, with a size of 521 bits.
Copying your Windows Public Key to the Server
To log in to the server, we need to put your public key into the servers .ssh/authorized_keys directory, then restart SSH.
Doing this on Windows via the command line is more complicated than on macOS and Linux. You can read more about this here. More information on Windows.
A simple way to do it is just to open the newly saved id_edcsa.pub (public key) file you just generated (NOT your private key), copy the text inside it, then login to your Linux server:
ssh [your_user]@[your-server-ip]
Navigate to your home folder:
cd ~
mkdir -p .ssh/
cd .ssh/
nano -p .ssh/authorized_keys
This opens a file called authorized_keys, or creates one if it doesn’t exist. Paste your public key in here, then save the file.
Finally, still inside your server, run:
systemctl restart ssh
And (if needed):
systemctl restart sshd
(It’s okay if the above command returns an error. I’m including this command to ensure we restart the daemon service if it’s running.)
Now, back on your local machine, you can test whether you can log in without a password with:
ssh [your_user]@[your-server-ip]
Copying your Linux or macOS Public Key to the Server
The following assumes you are using Linux or macOS. You can read about macOS’s case here.
On your LOCAL machine (not your server):
ssh-keygen -t ecdsa -b 521
ssh-copy-id [your_user]@[your-server-ip]
Enter your password when prompted.
Now let’s test logging in to the server without a password:
ssh [your_user]@[your-server-ip]
4) Disable root / password Login
Since we can now log in as a user with sudo privileges and authenticate using SSH keys, we should disable the root login and password login parts of our sshd_config file.
WARNING: Be certain you’ve set up SSH keys correctly before doing the following, as you will be locked out of the server otherwise (although you can regain access through Linode’s web portal terminal).
nano /etc/ssh/sshd_config
Inside the file that opens, find the lines “PermitRootLogin” and “PassAuthentication” and uncomment (remove the ‘#’ at the beginning of the line), and change them both to “no”.
PermitRootLogin no
PasswordAuthentication no
Save the file (if using Nano: Ctrl + X, then enter), then restart SSH to set the changes:
systemctl restart sshd
It’s a good idea to try and remotely log in with another terminal window to test everything is working.
Further Thoughts on Hardening
Our server should now be hardened against unsophisticated attacks. However, if we wanted, there is a lot more we can do to harden the server from here. Here’s a good resource on this topic.
Additional steps could include:
- Installing and setting up AppArmour.
- Removing unneeded Ubuntu default software.
- Installing and running SELinux.
- Disabling unnecessary services.
- Changing the default SSH port from 22 to something else.
Phew, we’ve done some basic server hardening! There’s always more we could do, like setting up SELinux, and changing the default SSH port, but those are outside the scope of this guide.
Web Server Set up
Now for the fun part, setting up your web server! There are many ways to do this, but I’ll be focusing on how I decided to set up https://cyberchirps.com.
Installing and Configuring Nginx
To turn our server into a webserver, we’ll need a tool like Nginx.
We simply configure Nginx and specify the location of our HTML and static files (/var/www/your_domain/hmtl), and it takes care of the rest. Since we’ve already opened up the Linode firewall ports 80 and 443, browsers that navigate to our server’s IP address will display the content of any files in that directory.
The basic installation process:
sudo apt install nginx
sudo systemctl start nginx
sudo systemctl enable nginx
On Linux, web files are generally served from the /var/www/ directory. We’ll need a new directory to hold our site:
sudo mkdir -p /var/www/[your_domain]
Set the owner of the directory to be our user:
sudo chown -R [your_user]:[your_user] /var/www/[your_domain]
Then set permissions to allow your user to read, write, and execute, while only allowing everyone else to read and execute:
sudo chmod -R 755 /var/www/[your_domain]
We’ll now need to configure Nginx to serve the files located at our new directory. Open up the Nginx configuration file in your favourite text editor:
sudo nano /etc/nginx/sites-available/[your_domain]
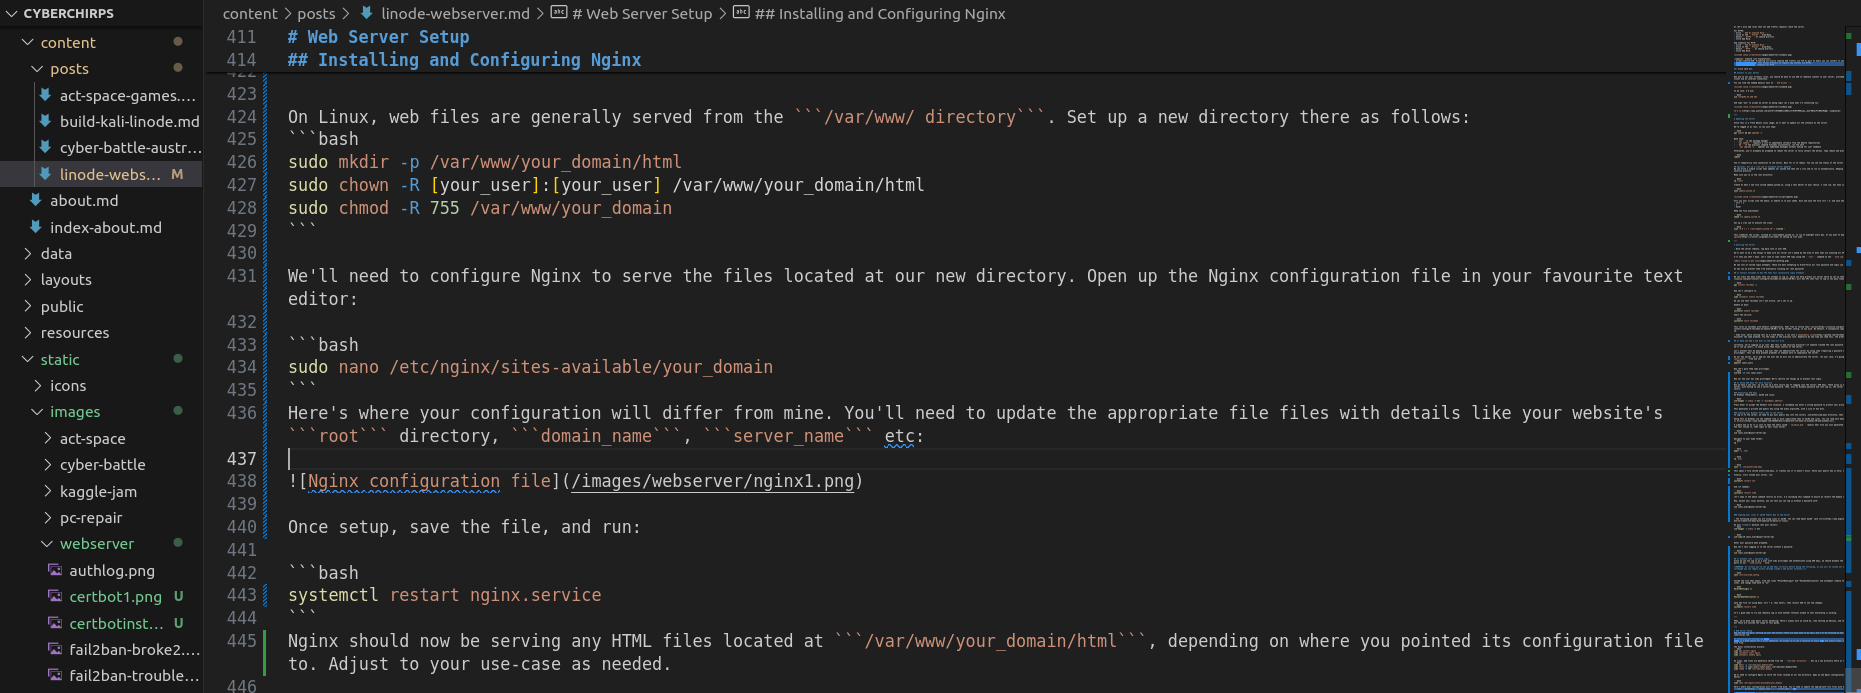
Here’s where your configuration will differ from mine. You’ll need to update the file with the appropriate details like your website’s root directory, domain_name, server_name, etc:
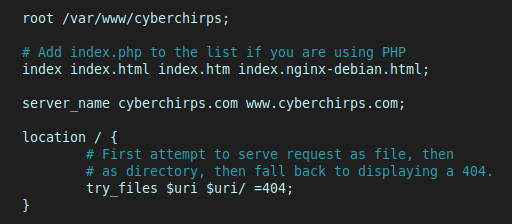
Once set up, save the file, and run:
systemctl restart nginx.service
Nginx should now be serving any HTML files located at /var/www/your_domain/, depending on where you pointed its configuration file to. Adjust to your use-case as needed.
Now you have a Web Server: what can you do with it?
Congratulations on reading this far! Hopefully you have gained a better understanding of Linode, along with Linux server administration.
From here, there is a world of options before you!
Here was my journey:
- I have some WordPress sites, but they were slow to load
- I learned that static sites are nice and fast
Today, I’m going to focus on how I built this site using a tool called Hugo.
My Project: Building CyberChirps with Hugo
At first, I experimented with writing raw HTML and CSS files and putting them into the /var/www/____ directory. This helped me understand how sites are served to users.
Later, I came across “static site generators”. Tools like Hugo or Jekyll, take Markdown files and then generate the full HTML files for you automatically. Static sites have the advantage of being more responsive, and more secure, than dynamic sites (they have less interactivity, and thus less code).
A static site seemed like the right option: I’d get practice setting up my server from scratch, while also not spending forever coding the website itself. Sounded great to me!
Choosing a Theme
Like WordPress, Hugo has “themes”, which are pre-prepared tools for achieving a certain site appearance.
I went with GoKarna
The user can install Hugo and GoKarna on their local machine, start creating Markdown files, and then Hugo will build a “public” folder containing all the HTML and contents. All the user needs to do then is copy this directory from their local machine to the webserver’s /var/www/____ directory, and Nginx will server it.
Here’s a sample of what this workflow looks like (detailed documentation here):
Transferring Site Files to my Server
After I finished creating my Hugo site files, I built the site with:
hugo
Now I just had to move them to my server. That’s where rsync comes in.
If you haven’t used the rsync tool (available on Linux and macOS) before, it’s amazing.
- You can sync any number of files between any two directories, locally or remotely
- Unlike FTP, the files are transferred securely, over SSH (which is great as we already have that set up!)
- It’s already installed!
These properties made it the perfect tool for backing up whole computers back in my former computer technician job. Now it’s time to whip it out again!
rsync -av /[public_files]/ [user_name]@[ip]:/var/www/[domain]
This command puts rsync in archive move (-a), preserving symbolic links, and verbosely (-v) syncs the files between my local public HTML Cyberchirps folder and the webserver.
Symbolic links are like a “shortcut” on Windows.
Automating this Process
Typing out the above commands every time is tedious, so I wrote a simple script (push_server.sh) that backs the site up to GitHub, then builds and pushes the site to my server, all in a single command:
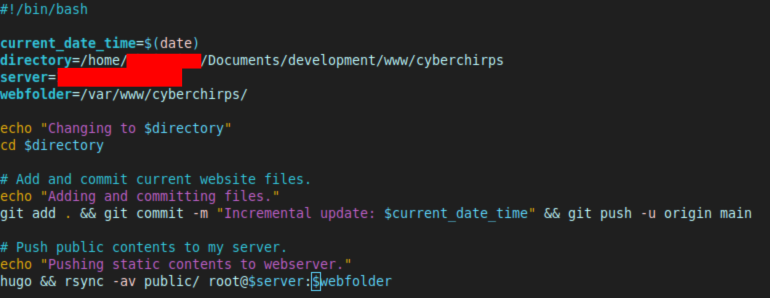
Once written, I made it executable with:
chmod u+x push_server.sh
+x adds execute permissions for the user (u).
No I can simply navigate to the directory containing the script and push updates to my server with:
./push_server.sh
And when logged into the server, I can make the changes live with:
sudo systemctl restart nginx
BAM! The new changes are live!
Buying a Domain
I did some research on good places to buy domains. I used to use grape.ca, but recently found out that namecheap has nice, affordable domains.
I created an account, and found that cyberchirps.com was available!
Domain Name System (DNS)
With the domain purchased, it was time to point Namecheap’s DNS servers to my website.
The general idea was:
- Go to NameCheap.com’s portal and login.
- Create a set of DNS ‘A records’ that assign my domain to my Linode server’s IP address.
- Save and wait for the DNS settings to propagate.
Getting a Free SSL with Certbot
I went to http://cyberchirps.com, and the site was live!
However, I still needed an SSL certificate, so the connection to the site would occur over https.
Certbot is a great tool to generate and set up an SSL certificates! Check out the requirements: see how we’ve got everything we need already?

I followed Certbot’s instructions for Ubuntu 20.
Very soon, I had a working SSL certificate!

Conclusion
There you have it! That’s the magic behind Cyberchirps. Nothing too fancy, but it was a great learning experience!
I hope you got something out of it too.
Coming up, I plan to write about using Linode to set up a custom Kali Linux box for doing CTFs and Hack The Box!